

 This is a guest post by Jen Killius. Jen is a budding tiki-drink-aholic and all-around booze enthusiast. She spends most of her free time and money doing “research” at cocktail bars, stocking her home liquor cabinet and posting the results on her blog, www.homespeakeasy.com
Do you have a couple bottles of random liquor sitting around your house? Have you ever wished that you could throw together some delicious cocktails on a moment’s notice? Maybe your story sounds like mine: About a year ago, after spending one too many nights and a few too many dollars on cocktails at bars, I decided that it might be time to do something about my habit. With tee-totaling out of the question, my only option was to cut out the middle man and learn how to experiment with cocktails at home.
Initially, it seemed like one hell of an undertaking. Aisle after aisle of vodka flavored for every mood imaginable. Dark rum, light rum, spiced rum, aged rum, etc, etc, etc. After lots of “research” (does driving down to Kentucky to try 6 different kinds of bourbon at The Party Source count?), I’ve learned a lot about what it takes to build your own home bar. If you have about $200 and an adventurous liver, you can easily start stocking your own liquor cabinet and begin to impress your friends with your own homemade creations.
Disclaimer: I am in no way a professional. I’m a booze hobbyist and enthusiast, and nothing more. With that in mind, I hope you can benefit from the research and experience I’ve gathered over the past year, and I hope you have as much fun experimenting as I have!
Tools

© Jen Killius
Shaker
There are 3 popular kinds of shakers: a Boston shaker, which is a 2 piece shaker made up of a plastic or glass pint sized cup and a metal bottom, a French shaker, which is also a 2 piece shaker with both a metal bottom and a metal cap, and finally, a Cobbler shaker, which is a tapered 3 piece metal shaker with a built-in strainer and a cap. My personal favorite is the Oggi Cocktail Shaker, both for looks and utility; in my opinion, it’s the easiest to use.
Measuring Cup
The measuring cup is essential for precise measurement of spirits so that your cocktails will be well-balanced and tasty. I prefer a mini measuring cup to a jigger because it measures down to ¼ oz and it’s easy to read.
Hawthorne strainer
A Hawthorne strainer is handy to have around, and is necessary if you opt to get a Boston or French shaker. Even if you have a Cobbler shaker, it’s a good tool to use if you find that your top leaks or if you want a more controlled pour for frothy drinks.
Long bar spoon
Perfect for those stirred NOT shaken drinks, the long bar spoon it has a nice, long handle for reaching all the way down to the bottom of your shaker.
Bonus tools
If you have some extra money sitting around (hey there, big spender), these are some bonus
goodies that aren’t essential but are pretty handy to have around:
Hand-held citrus juicer
This hand juicer is probably my favorite non-essential. It’s a great little tool that gives you no excuse not to have fresh squeezed lemon and lime juice for your drinks.
Lemon zester and/or vegetable peeler
This zester is great for creating those fancy little orange and lemon peel curly-cue garnishes.
Muddler
A classier alternative to smashing fruit with a fork or spoon, the muddler is pretty important if you plan to make a lot of mojitos or mint juleps.
Fine mesh strainer
A mesh strainer is handy for straining drinks that have accidental floaters or for straining down syrups.
Extra large ice cube tray
I find that I actually use these ice cube trays quite frequently. The extra large ice cubes it produces are perfect for when you want a drink “on a rock”. Protip: try boiling filtered water to get clearer ice cubes (you’d be surprised how intense the quest for perfectly clear ice can get among cocktailaholics).
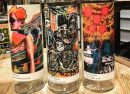
Glassware

© Jen Killius
pants cocktail out of a coffee mug. Many drinks have very specific types of glasses that they
should be served in, however you can get away with just a few different kinds:
A rocks glass (aka an old fashioned glass)
A short, squat 4-8 oz glass perfect for drinks that you want to serve with ice cubes.
A cocktail glass
For drinks served up, you should use either a 3-6 oz martini glass (shudder) or my personal favorite, the champagne coupe. The coupe is small, saucer shaped glass that is not only pretty, but much easier to drink from, in my opinion.
Highball/Collins glass
This tall, thin 10-14 oz glass can be used for drinks with crushed ice.
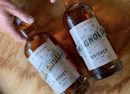
The Booze

© Jen Killius
give you a good base for mixing some simple, yummy drinks. Next to each one, I’ve listed my
personal favorite, balancing cost and quality.
Light Rum (Mount Gay or 10 Cane)
Bourbon (Bulleit or Woodford Reserve)
Tequila (Cazadores)
Gin (Bluecoat)
Vodka (Tito’s or Middle West Spirits)
Triple sec (Cointreau is nice, but you could also start out with a cheaper, basic brand)
Grenadine (homemade is preferable and easy to make)
Simple Syrup (again, homemade is preferable and easy, so there’s no excuse)
Sweet Vermouth (Vya is good but if you’re just starting out, there’s no shame in Martini and
Rossi)
Angostura bitters
These should all be readily available at your local liquor store – try Weiland’s Gourmet Market, Huffman’s Market, Hills Market or Europia in Central Ohio to stock up.
Bonus Booze
If you still have money left over, here’s a list of other affordable boozes and liqueurs that help
round out a beginner’s bar:
Brandy
Cherry Heering
Scotch (get a blended scotch for mixed cocktails)
Rye
Dark Rum
Luxardo Maraschino Liqueur
Cointreau
Absinthe or an anise flavored liqueur
Benedictine
Domaine de Canton
St. Germain
Creme de Menthe
Creme de Cacao
Dry Vermouth
Peychaud’s bitters
Other assorted bitters (Fee Bros, Bittercube, Bittermens, etc)
Extra Credit
Now that you have all this glorious alcohol, here are some great books to check out for history
on the cocktail as well as classic recipes:
- The Joy of Mixology by Gary Regan
- The Essential Cocktail by Dale Degroff
- Vintage Spirits and Forgotten Cocktails by Ted Haigh
- Imbibe! by David Wondrich
- Punch by David Wondrich
- Beach Bum Berry Remixed by Jeff Berry
Congratulations, you’re now the proud owner of your very own home bar!
Remember, these are only the bare essentials. A well-rounded home bar is never really
finished; there will always be another hard-to-find bottle of rum, an aged whiskey or an exotic
amaro to lust after. Be adventurous and try to pick up a new spirit every time you’re at the liquor
store or experiment with making your own syrups or tinctures. Above all, have fun and share
your creations! Cheers!


6 Comments on "So You Want To Stock Your Bar at Home"
Jen – you didn’t do enough shameless self promotion for your blog here. Do you have any info on how to make grenadine and syrups there?
Here’s a link to all the grenadine and syrup recipes, Brandie.
http://www.homespeakeasy.com/?p=84
For your bar’s hardware, I recommend shopping where the restauranteurs shop, Wasserstrom. Over on Silver Drive off 71, I was able to get a variety of shot glasses, highballs, along with a mixing tin, strainer, muddler, spoon, and a bag of pour spouts for about $25. Tell them you’re a student, you’ll get 10% off your order. I’m 27 and far out of college, but with a wink and a nod, told the cashier I was going home to study & practice 😉
The home mixologist doesn’t necessarily need pour spouts if she is going to be measuring the proportions out, but I would encourage anyone to get a bag of these, even the cheap molded plastic variety, and spend some time learning to “free-pour”. Once you’re comfortable with it, guests will appreciate the speed with which you sling the drinks. You’ll want to get an empty bottle, fill it with water, cap it with a spout, and learn to count out a 1oz pour, usually just counting to 4. Once you’ve got that part down, start breaking it down to a 1/2oz pour, etc, and you’ll soon be able to look at a recipe you’ve never mixed before and simply count it out.
Ooh thanks for the tip on Wasserstrom! Good to know that the “student” discount is offered up liberally 🙂
Definitely suggest keeping a few bottles of bonded spirits (aka “bottled-in-bond”) on hand. They’re extremely affordable and they make killer cocktails. Rittenhouse Rye is our go-to.
Great article. Thanks a ton!
Trackbacks for this post